
Crayons have been very active in our household just the past 2 years. Along with its usage come the stubs and the broken. Then there are the singles collected from restaurants that don't 'fit' in with the rest of our crayons and hence neglected in the broken pile. This week our project was to recycle them and make rainbow crayons.

Fun project to do with the kids and reinforce recycling. Want to make your own crayons? Read on for my step-by-step...
Start by peeling off the paper from each of the pieces. This is rather time consuming. Big Sister and I were chatting up a storm while doing this! (You might notice a few full crayons in the pile too...These are the ones from the restaurants' kids' menus. Unless the restaurant reuses them, we bring them home instead of just throwing them away...)

Break them into little pieces, not more than an inch in length.

Here are two methods to melt the crayons. One is faster and needs an oven. The other is a little slower and a stove top will suffice.
Oven Method:
Grab a mini-muffin pan and line them up with mini-muffin liners. Now, the crayons are marketed as non-toxic. So there should be no harm if you use them directly on the pan...BUT I just wasn't comfortable with that and used liners. PLUS cleaning up was EASY!

Fill each of them upto half of the cup with crayons. Here you may go monochromatic by filling up similar colored crayons in one cup. Then you will have a monochromatic crayon. We wanted something different than what we already had. So we piled them up with varying colors for the 'rainbow' effect.

This is a step for grown-ups only!
Pop the tray into the oven. 'Cook' at 350 F (175 Deg C) for 7-8 mins. Keep in mind, different brand crayons melt at different rates. The purer ones melted fast and the thin cheaper ones melted very slow. As we had mixed up the brands here, we had to overcook them. As a result we lost some of the rainbow effect that we wanted, because the melted wax started mixing with each other, forming new colors.
Once all the pieces have melted, take the pan out of the oven and let it cool for about 20 mins.

Alternate method:

Bring a large pan with about 1/4th filled with water to boiling. Place the cups filled with crayons on the water. Have just enough water so the cups don't float and at the same time, enough to transfer the heat. This takes a little bit longer to melt the wax. Mine took about 15 minutes. You might want to replenish small quantities of water as they boil away...
Once the cups/muffin pans have cooled, you can take out the liner and peel it off. Since we had used liners, we had absolutely no spill overs into the cups. We just had to throw away the used liners.

You can also make these with shaped ice-cube trays or candy templates to make interesting shaped crayons.

Fun project to do with the kids and reinforce recycling. Want to make your own crayons? Read on for my step-by-step...
Start by peeling off the paper from each of the pieces. This is rather time consuming. Big Sister and I were chatting up a storm while doing this! (You might notice a few full crayons in the pile too...These are the ones from the restaurants' kids' menus. Unless the restaurant reuses them, we bring them home instead of just throwing them away...)

Break them into little pieces, not more than an inch in length.

Here are two methods to melt the crayons. One is faster and needs an oven. The other is a little slower and a stove top will suffice.
Oven Method:
Grab a mini-muffin pan and line them up with mini-muffin liners. Now, the crayons are marketed as non-toxic. So there should be no harm if you use them directly on the pan...BUT I just wasn't comfortable with that and used liners. PLUS cleaning up was EASY!

Fill each of them upto half of the cup with crayons. Here you may go monochromatic by filling up similar colored crayons in one cup. Then you will have a monochromatic crayon. We wanted something different than what we already had. So we piled them up with varying colors for the 'rainbow' effect.

This is a step for grown-ups only!
Pop the tray into the oven. 'Cook' at 350 F (175 Deg C) for 7-8 mins. Keep in mind, different brand crayons melt at different rates. The purer ones melted fast and the thin cheaper ones melted very slow. As we had mixed up the brands here, we had to overcook them. As a result we lost some of the rainbow effect that we wanted, because the melted wax started mixing with each other, forming new colors.
Once all the pieces have melted, take the pan out of the oven and let it cool for about 20 mins.

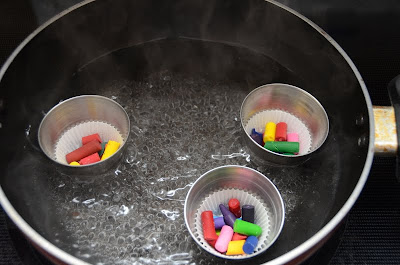
Alternate method:
If you don't have an oven or a muffin pan, here's another way to melt the wax. Again this is a step for grown-ups only as the melted wax tends to be very very hot.
You can use any small cup and liner. You may or may not want to use liner. The wax washes up pretty easily with warm water and soap once you are done with the project. And the crayons claim to be non-toxic. But using a liner involved absolutely no clean-up and I did not have to worry about any leftover crayon on my utensils.

Bring a large pan with about 1/4th filled with water to boiling. Place the cups filled with crayons on the water. Have just enough water so the cups don't float and at the same time, enough to transfer the heat. This takes a little bit longer to melt the wax. Mine took about 15 minutes. You might want to replenish small quantities of water as they boil away...

Once the cups/muffin pans have cooled, you can take out the liner and peel it off. Since we had used liners, we had absolutely no spill overs into the cups. We just had to throw away the used liners.

You can also make these with shaped ice-cube trays or candy templates to make interesting shaped crayons.

No comments:
Post a Comment